How to Print a Passport-Size Photo in Windows: A Step-by-Step Guide
Printing passport-size photos at home can be a cost-effective and convenient alternative to visiting a photo studio. With the right tools and a little know-how, you can produce high-quality photos that meet official requirements. This guide will walk you through the process of printing a passport-size photo using Windows, and introduce you to our comprehensive services at Passport Photo Online. Additionally, we’ll explain how you can take and prepare your own passport photos at home using our mobile app, “Passport Photo app & Code,” available on Google Play Store and Apple App Store.
Step-by-Step Guide to Printing Passport-Size Photos in Windows
Step 1: Prepare Your Photo
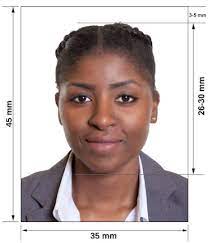
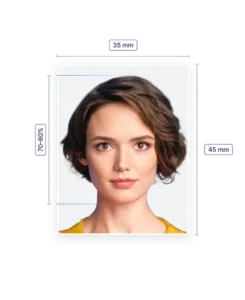
Before printing, ensure your photo meets the specific passport photo requirements. For UK passports, these include:
- Size: 45mm x 35mm
- Background: Plain, light-colored background (preferably white or light grey)
- Head Position: Your head should be centrally aligned, looking straight into the camera.
- Expression: Neutral expression with mouth closed, no smiling.
- Eyes: Eyes open and clearly visible, no glasses with tinted lenses, no hair covering the eyes.
- Lighting: Even lighting with no shadows on the face or background.
Step 2: Use Photo Editing Software
To adjust and prepare your photo, you can use built-in Windows tools or third-party photo editing software. Here’s how to do it using Microsoft Paint and Photos:
- Open Your Photo in Paint:
- Right-click the photo file and select “Open with” > “Paint”.
- Crop the Photo:
- Use the “Select” tool to choose the area that fits the passport photo requirements.
- Click “Crop” to cut out the selected area.
- Resize the Photo:
- Go to the “Resize” option in the toolbar.
- Select “Pixels” and ensure the photo size is set to 413 pixels wide by 531 pixels high (this corresponds to 35mm x 45mm at 300 dpi).
- Save the Photo:
- Save your cropped and resized photo as a new file.
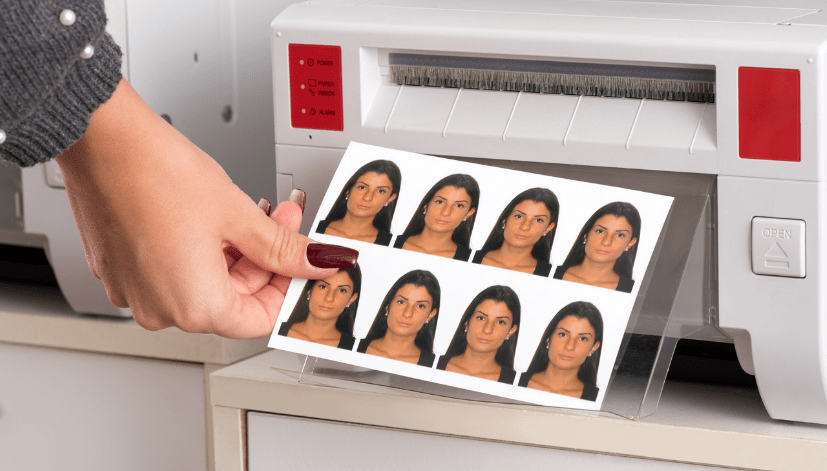
Step 3: Print Your Photo Using Windows Photo Viewer
- Open the Photo in Windows Photo Viewer:
- Right-click the edited photo file and select “Open with” > “Photos”.
- Print the Photo:
- Click on the “Print” icon or press Ctrl + P.
- In the print dialog box, select your printer and paper size. Use 4×6 inch photo paper for the best results.
- Click on “Options” and then “Full Page Photo” to ensure the photo prints correctly.
- Adjust Print Settings:
- Ensure the “Fit picture to frame” option is unchecked to avoid cropping the photo further.
- Click “Print” to start printing.
Step 4: Cut Out the Photos
After printing, use a pair of scissors or a paper cutter to carefully cut out the passport-size photos along the edges.
How Passport Photo Online Can Help
At Passport Photo Online, we offer a range of services to simplify the passport photo process:
- High-Quality Printing and Delivery:
- We provide high-quality passport photo printing services, ensuring your photos meet all official requirements.
- Our delivery service is available throughout the UK, with same-day or next-day options.
- For customers based in London, we offer same-day printing and delivery.
- Professional In-House Studio:
- Our in-house photo studio is equipped to take professional passport photos for any country.
- We are open seven days a week, including weekends, for your convenience.
- Mobile App: Passport Photo app & Code:
- Our mobile app, available on Google Play Store and Apple App Store, makes taking passport photos at home easy and convenient.
- The app provides step-by-step instructions and ensures your photos meet all the necessary criteria.
Using Our Mobile App: Passport Photo app & Code
Here’s how to take and prepare your passport photo using our mobile app:
- Download and Install the App:
- Search for “Passport Photo app & Code” in your app store.
- Download and install the app on your smartphone.
- Create an Account:
- Open the app and create an account using your email or social media login.
- Follow the In-App Instructions:
- The app guides you through the process of taking a passport photo.
- It helps you position yourself correctly and ensures the photo meets all the requirements.
- Capture the Photo:
- Use the app to take your photo. The app will check for issues like shadows, incorrect head position, or inappropriate expressions.
- Retake the photo if necessary until it meets all the criteria.
- Review and Edit:
- The app offers basic editing tools to crop and adjust the photo.
- You can change the background color if needed to match the required specifications.
- Submit for Printing:
- Once satisfied with the photo, submit it through the app for printing.
- Choose your preferred delivery option – same day, next day, or standard delivery.
Conclusion
Printing passport-size photos at home using Windows is a straightforward process if you follow the correct steps and ensure your photos meet the required standards. Passport Photo Online simplifies this process further by offering high-quality printing and delivery services throughout the UK, with special options for customers in London. Additionally, our mobile app, “Passport Photo app & Code,” provides an easy and efficient way to take, edit, and submit your passport photos from home. Whether you choose to print photos at home or use our professional services, we are committed to ensuring your passport photo needs are met with the highest standards of quality and convenience.