In an increasingly digital world, taking your own passport photo has never been easier, especially with devices like the iPad. Whether you’re applying for a passport, a visa, or another form of identification, you need a high-quality photo that meets specific requirements. In this article, we’ll provide a step-by-step guide on how to take a passport photo using your iPad, discuss how Passport Photo Online can assist with printing and delivery services, and introduce our free mobile app, “Passport Photo app & Code,” available on Google Play Store and Apple App Store.
Why Take a Passport Photo at Home?
Taking a passport photo at home offers numerous advantages:
- Convenience: You can take your photo whenever it suits you, without having to rush to a photo booth or studio.
- Comfort: You can choose your setting, ensuring that you feel relaxed and at ease during the photo-taking process.
- Control: You can take multiple shots until you get the perfect photo that meets all requirements.
Preparing to Take Your Passport Photo
Before you start taking your passport photo, it’s essential to prepare both yourself and your environment to ensure the best results.
1. Check the Requirements
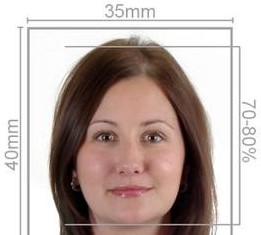
In the UK, passport photos must meet specific guidelines set by the UK government. Here are the key requirements to keep in mind:
- Size: The photo must be 45mm high by 35mm wide.
- Background: Use a plain, light-coloured background (white, grey, or light blue is ideal).
- Lighting: Ensure the photo is well-lit with no shadows or reflections.
- Expression: Maintain a neutral expression with both eyes open, and mouth closed. Your face should be fully visible.
2. Setting Up Your Environment
- Choose a Location: Find a space with good natural light, such as near a window. Avoid direct sunlight, which can create harsh shadows.
- Background: Set up a plain wall or hang a solid-coloured sheet to serve as your backdrop.
- Positioning: Ensure you have enough space to stand at least one metre away from the background.
3. Prepare Your iPad
- Camera Setup: Open the camera app on your iPad. You may want to use the rear camera for better quality.
- Stabilization: To prevent blurriness, consider using a tripod or propping your iPad on a stable surface.
- Framing: Ensure your head and shoulders are visible within the frame. You should fill about 70-80% of the photo.
Taking the Photo
Now that you’re prepared, it’s time to take your passport photo.
1. Position Yourself
- Stand or sit straight, facing the camera directly.
- Make sure your face is evenly lit, with no shadows.
2. Use the Timer
- Set the timer on your iPad’s camera (usually 3 or 10 seconds) to allow yourself time to get into position.
- Press the shutter button and step back into the frame.
3. Check the Photo
- Review the photo to ensure that it meets all requirements. Check for clear visibility, proper lighting, and background.
4. Take Multiple Shots
- Don’t settle for just one photo; take several until you find the one that looks best. This gives you more options to choose from.
Editing Your Passport Photo
Once you have a suitable photo, you may need to crop and adjust it to fit the official requirements.
1. Use Photo Editing Software
- You can use built-in editing features on your iPad or third-party apps to crop the image to the correct size.
- Make sure the final dimensions are 45mm high by 35mm wide.
2. Adjust Brightness and Contrast
- Ensure the photo has even lighting without shadows. You can adjust brightness and contrast in editing apps to enhance clarity.
Using the Passport Photo app & Code
To simplify the process, we recommend using our free mobile app, “Passport Photo app & Code,” available for download on both the Google Play Store and Apple App Store. This app offers several features to help you take and prepare your passport photo:
Features of the App
- Guided Instructions: The app provides clear instructions on how to take a proper passport photo.
- Automatic Cropping: It can automatically crop your photo to the correct dimensions, ensuring compliance with passport photo guidelines.
- Digital Passport Photo Code: The app generates a digital code for your passport application, making it easier for you to submit your photo online.
Printing Your Passport Photo
Once you have taken and edited your photo, you can choose how to obtain your physical passport photo.
1. Print at Home
If you have a printer, you can print your passport photo directly at home. Make sure to use high-quality photo paper and the correct settings to ensure the best results.
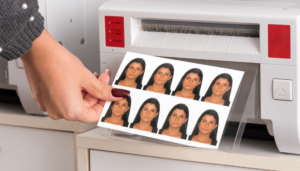
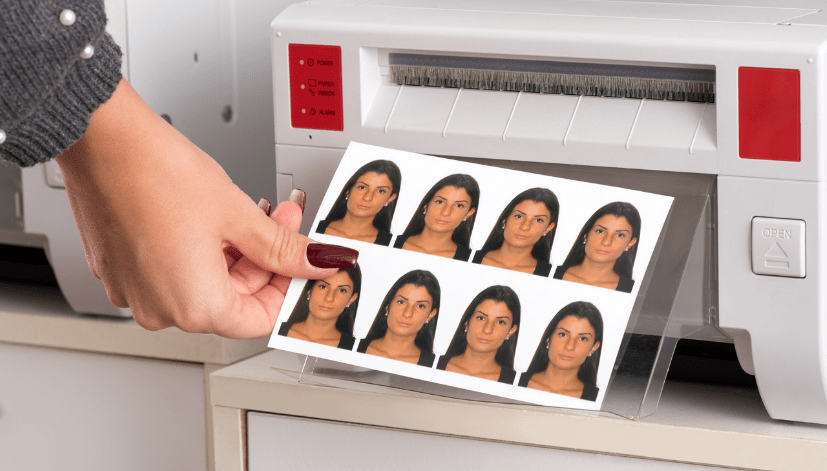
2. Order from Passport Photo Online
At Passport Photo Online, we specialize in high-quality passport photo printing and delivery services across the UK. Here’s how we can help:
- Professional Printing: Simply upload your photo to our website, and we will print it according to all UK passport photo specifications.
- Same-Day and Next-Day Delivery: For customers in London, we offer same-day printing and delivery services. For those outside London, we provide next-day delivery.
- Convenient Ordering: Our user-friendly website allows you to easily upload your photo, select your printing options, and place your order from the comfort of your home.
- Open Seven Days a Week: We operate every day, including weekends, so you can access our services whenever you need them.
Conclusion
Taking a passport photo on your iPad in the UK is a straightforward process, especially with the right tools and guidance. By following the steps outlined in this article, you can create a high-quality passport photo that meets all official requirements.
If you prefer not to deal with the hassle of photo booths, Passport Photo Online is here to help. With our professional printing and delivery services, along with our user-friendly mobile app, you can take your passport photo from home and receive prints delivered right to your door.
Say goodbye to long waits at photo booths and embrace the convenience of capturing your passport photo at home with Passport Photo Online. Download our app today and get started on your passport photo journey!